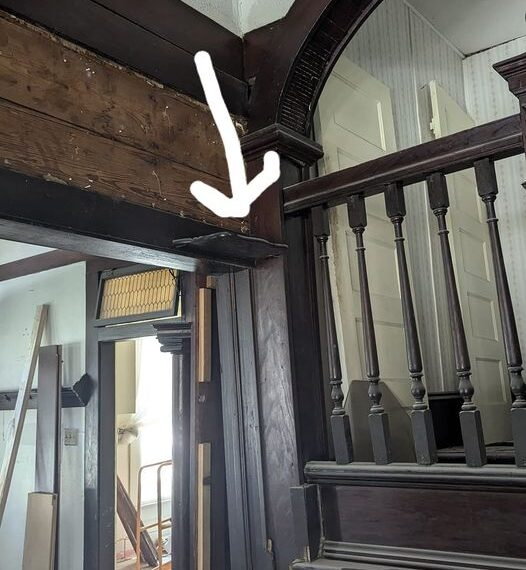
Consider entering your grandparents’ home, where every room had a story to tell and every corner possessed a relic. Of these, the oil lamp shelves placed on the walls to this day will make you feel the warmth that you used to experience while reading under them. These shelves, which were an important part of the early twentieth-century houses, were not just practical – they were a symbol of a time when the light of an oil lamp would unite family members in the evening.
Usually wooden or metallic, oil lamp shelves were commonly located in various parts of the house to ensure the light’s effectiveness. These shelves were frequently located on walls in the living room, bedrooms, and hallways. They were not randomly placed; they were strategically positioned to ensure that there was enough light for activities done in the evening such as reading, sewing or even family meetings.
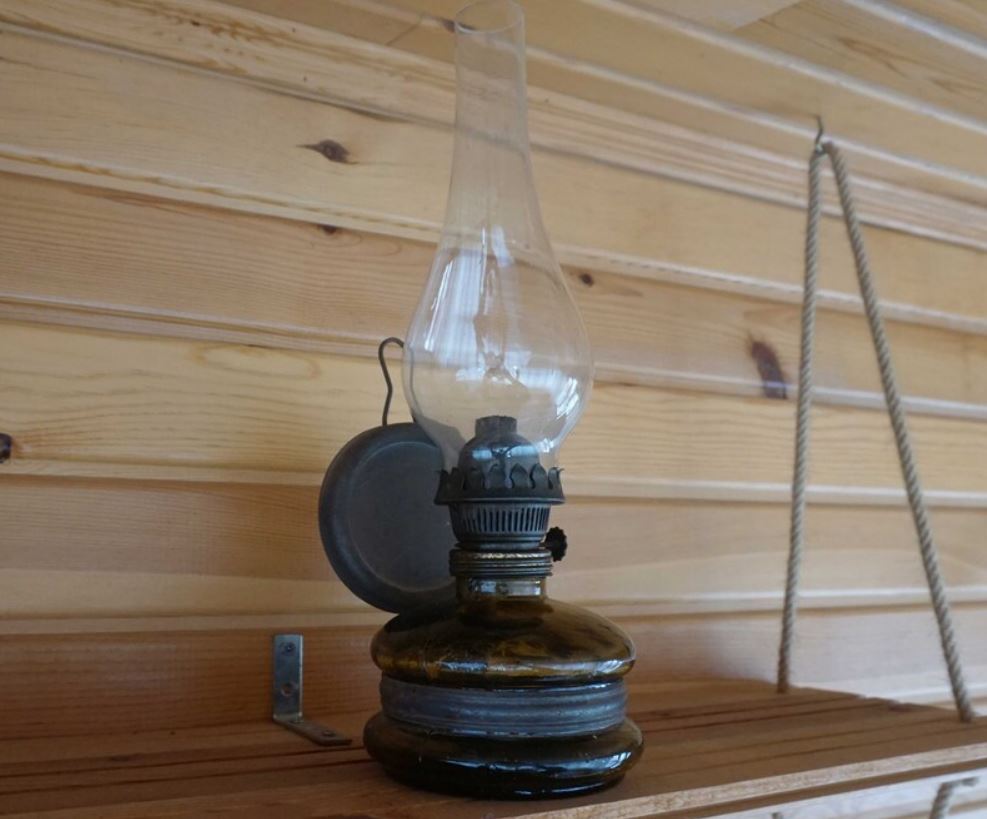
The form of these shelves or niches was quite diverse, ranging from flat ledges to more complex constructions complete with guardrails to avoid lamp tip overs. In wealthier homes, these shelves may have been elaborately decorated or even incorporated into the design of the room, complete with carved-out niches and fancy trim that matched the rest of the house.
This was because oil lamps presented a fire risk due to the exposed flame. Shelves for oil lamps were therefore intended to keep the lamps stowed away from the everyday activities in the house while at the same time letting in the light. These were usually located in positions that were not easily accessible to children and not close to curtains or any other combustible material. This tactical positioning ensured that risks of fire breakouts were reduced to the barest minimum while issuing adequate light.

The existence of oil lamp shelves in old houses gives us an insight into the lifestyles and the technological advancements that were available at the time. Lighting was an important part of people’s lives before the use of gas and electric lights and this meant that the management of lighting was an important part of the daily routine and architecture. These shelves were an important part of the interior design and showed how people of that time managed to optimize the use of living spaces.
Today, oil lamp shelves in historic homes are kept for both their functionality and their historical and cultural value. In the modern homes where such shelves have been installed, they are used for storing candles, plant among other items to enhance the beauty of the house. This is because preservation measures always aim at preserving the original construction features and the material used in the construction in this case the design of the period.
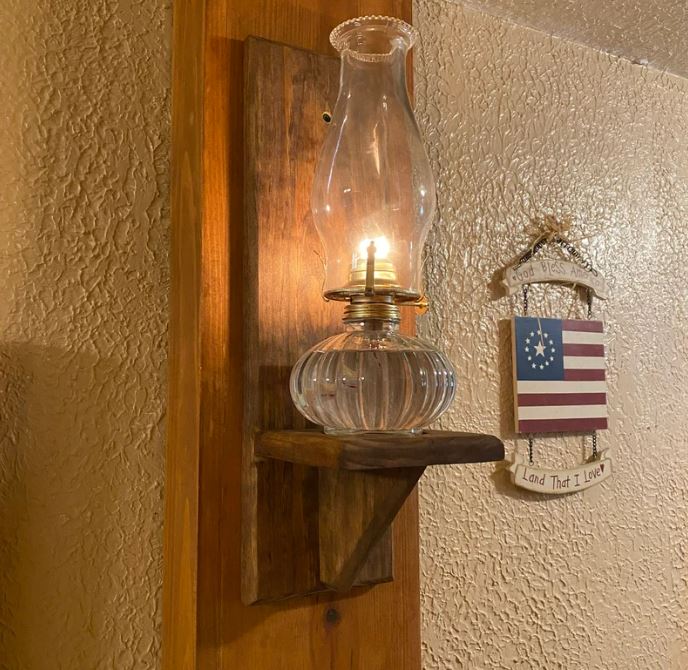
Therefore, the shelves for oil lamps in old houses are not only practical furniture pieces, but they are also a symbol of the creativity of the previous generations and a link to the tangible world of the past. Such details give us ideas about the changes that were made by our ancestors and make us reflect on how these architectural landmarks should be preserved.
A ex-mulher do meu marido exigiu que eu pagasse as contas após sua morte – ela se arrependeu de eu ter atendido aos seus caprichos

Quando meu marido faleceu, pensei que o luto seria minha batalha mais difícil. Eu estava errada. Sua ex-esposa, Camila, transformou minha perda em sua oportunidade, EXIGINDO QUE EU PAGASSE TODAS AS SUAS CONTAS. Sua ganância implacável me esgotou, mas nunca imaginei que isso levaria ao seu MAIOR ARREPENDIMENTO um dia.
A tristeza não vem em pequenos pacotes organizados. Ela é confusa, crua e implacável. Quando Joseph — meu marido, parceiro e melhor amigo — faleceu duas semanas antes do Natal, parecia que o mundo tinha sido arrancado de mim. Eu tinha Nathan, nosso filho de 15 anos, para pensar. Mas na maioria dos dias, até respirar parecia impossível.
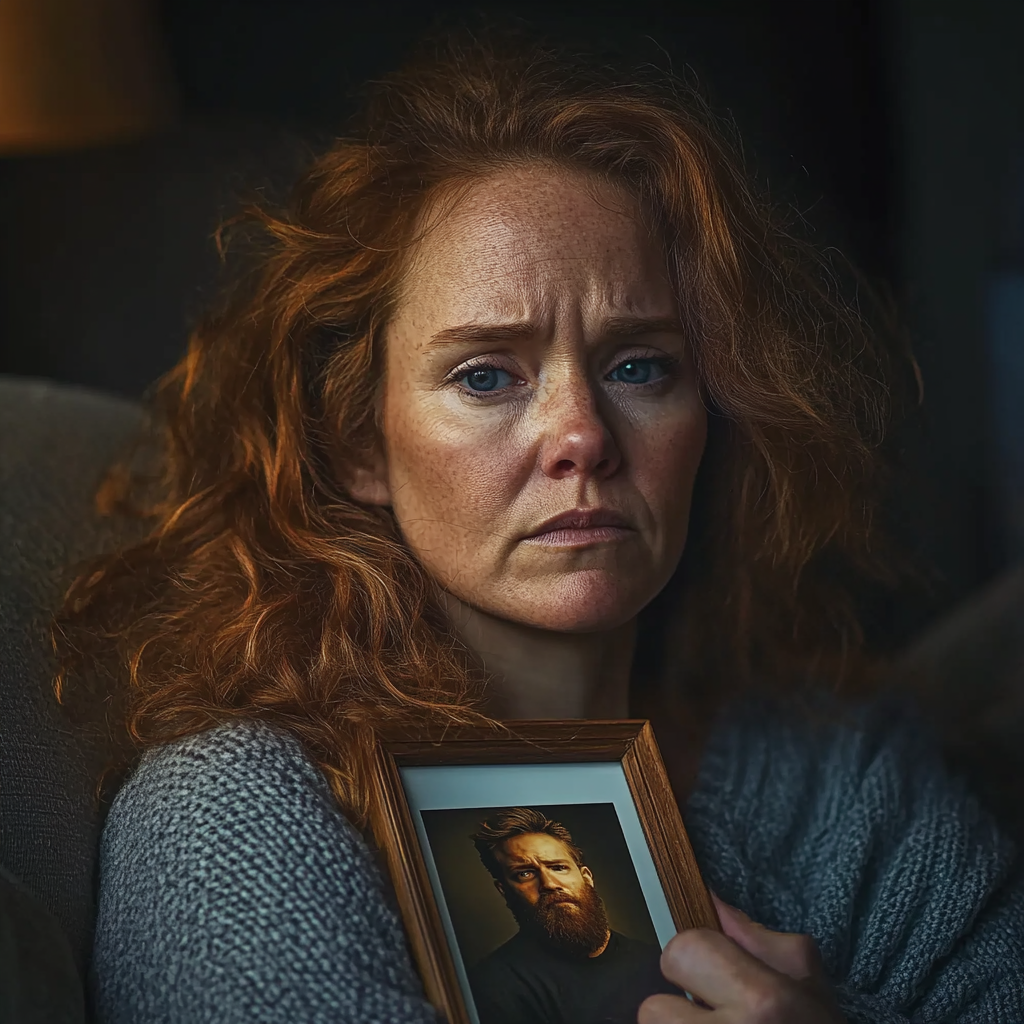
Uma mulher em luto segurando uma foto emoldurada de um homem | Fonte: Midjourney
Joseph era o tipo de homem que trazia luz a todos os cômodos. Ele amava intensamente e dava generosamente, mesmo para pessoas que não mereciam… como sua ex-esposa, Camila. Eles tiveram um filho juntos, Marcus, mas Camila teve outros três filhos de relacionamentos diferentes.
Joseph, sendo o homem que era, fez questão de tratar todas as quatro crianças como se fossem suas. Aniversários, feriados, eventos escolares — ele estava sempre lá, sempre dando e se importando.
No dia seguinte ao funeral, recebi um e-mail de Camila. A princípio, pensei que seriam condolências, mas, claro, isso seria esperar demais. Em vez disso, era uma LISTA DE NATAL. Ela queria presentes para os filhos, alegando: “É o que Joseph teria desejado”.

Uma mulher segurando um celular | Fonte: Midjourney
Quando meu telefone tocou momentos depois, eu sabia que era ela. Sua voz pingava uma falsa simpatia que fez minha pele arrepiar.
“Wendy, querida,” o tom de Camila era doce e açucarado. “Espero que você não fique sobrecarregada com essa lista. Joseph sempre se certificou de que meus filhos fossem cuidados durante o Natal.”
Segurei o telefone com mais força, meus dedos ficando brancos. “Camila, mal estou me segurando agora.”
Ela soltou uma risada calculada. “Bem, não é culpa das crianças! Elas não deveriam sofrer só porque Joseph não está mais aqui para ajudar.”
“Camila, você não entende. Ele simplesmente faleceu e—” Eu disse desesperadamente, mas ela me cortou.
“Oh, vamos lá. Joseph gostaria que você honrasse sua memória continuando suas tradições. Essas crianças estão esperando seus presentes. Você não gostaria de decepcioná-las, gostaria?”

Uma mulher falando ao telefone | Fonte: Midjourney
A manipulação era transparente, mas cortava fundo. “Esses são seus filhos também”, sussurrei, minha voz embargada.
“Eles são filhos de JOSEPH”, ela corrigiu bruscamente. “Bem, Marcus é. Mas os outros… eles passaram a amá-lo tanto. E você sabe o quanto ele amava todos eles. Tenho certeza de que você quer provar que boa madrasta você pode ser. Afinal, ele se casou com você sabendo que eu sempre estaria na foto.”
Eu deveria tê-la ignorado. Eu deveria ter dito não. Mas então pensei nas crianças. Não foi culpa delas. Então, engoli meu orgulho e, entre lágrimas, fui comprar os presentes delas, junto com meu filho.
O Natal chegou e passou em um borrão de tristeza e sorrisos forçados. Mas Camila não tinha terminado. Suas exigências se tornaram uma cascata implacável, cada pedido mais audacioso que o anterior.

Uma mulher alegre com uma pilha de caixas de presentes | Fonte: Midjourney
Em fevereiro, eram aulas de piano. Quando ela ligou, sua voz era uma mistura calculada de doçura e autoridade. “Wendy, querida, Joseph sempre quis que Marcus tivesse aulas de música. Você não iria querer decepcionar o filho dele, iria?”
Fechei os olhos, sentindo o peso da manipulação dela. “Camila, estou lutando para manter as coisas juntas—”
“As crianças não deveriam ter que perder”, ela interrompeu. “Pense no que Joseph iria querer.”
Na Páscoa, eram as taxas do acampamento de verão. O chamado dela veio com precisão cirúrgica. “Essas experiências são muito importantes para o desenvolvimento das crianças. Joseph sempre acreditou em dar oportunidades às crianças.”
“Não posso continuar fazendo isso”, sussurrei.
“Ah, Wendy”, ela riu, “você sabe que Joseph ficaria arrasado se seus filhos ficassem sem nada por causa de dificuldades financeiras.”

Uma mulher frustrada falando ao telefone | Fonte: Midjourney
Então chegou o momento que quebrou algo dentro de mim. Um dia, ela ligou, sua voz pingando mel. “Wendy, odeio perguntar, mas minhas costas estão me matando. O médico disse que a cirurgia pode me ajudar a ser uma mãe melhor. As contas médicas são astronômicas, e com Joseph fora…”
Sua pausa foi deliberada, carregada de expectativa.
Claro, eu paguei. O que mais eu poderia fazer? Nathan me observou, seus olhos cheios de pena e frustração. “Mãe, por que você continua dando dinheiro a ela?”, ele perguntou uma vez. Eu não tinha resposta.
Mas semanas depois, me deparei com a postagem dela no Facebook:
“Lipo e abdominoplastia feitas! Me sentindo FABULOSA! “
Segurei meu telefone com tanta força que pensei que ele fosse quebrar. Ela tinha usado meu dinheiro para CIRURGIA PLÁSTICA. Não um procedimento médico, não algo para seus filhos, mas pura vaidade. Eu me senti mal, a traição cortando mais fundo do que qualquer faca.

Uma mulher chocada segurando um telefone | Fonte: Midjourney
Nathan entrou e viu minha expressão. “Mãe?”, ele perguntou cautelosamente. “O que foi?”
E naquele momento, algo dentro de mim começou a mudar. Uma resolução. Uma raiva.
Ainda assim, não parei de ajudar Camila. Havia crianças envolvidas — crianças que vinham até mim com joelhos ralados e desilusões de adolescentes. Crianças que me abraçavam forte e me chamavam de “tia Wendy”. Elas não eram responsáveis pelos esquemas de suas mães.
Mas então, uma nova demanda chegou na minha caixa de entrada logo depois: uma viagem para Paris para ela e as crianças. O e-mail foi uma obra-prima de manipulação. Ela me lembrou docemente: “Joseph sempre acreditou em férias em família. Ele não deixaria as crianças irem sem uma.”

Foto em close de uma mulher segurando um smartphone | Fonte: Midjourney
Fiquei horas ali com aquele e-mail, minha frustração fervendo. Nathan estava lutando contra a leucemia na época. As contas médicas estavam me afogando, os tratamentos eram astronômicos e cada centavo era uma luta pela sobrevivência.
A última coisa que eu podia pagar era financiar a viagem extravagante da ex do meu marido.
Quando finalmente liguei para ela, minha voz tremeu de raiva e desespero. “Camila, não consigo mais fazer isso. Mal consigo manter minha cabeça acima da água.”
Sua risada era fria e calculada. “Mal consegue manter a cabeça acima da água? Oh, Wendy, você esquece que eu sei exatamente quanto seguro de vida Joseph deixou para você. Isso é troco para você.”

Uma mulher sorridente falando ao telefone | Fonte: Midjourney
“Troco?”, quase gritei. “Estou gastando cada centavo no tratamento do Nathan. Ele está lutando pela vida!”
O tom dela endureceu imediatamente. “Então, as crianças devem sofrer por causa do seu PLANEJAMENTO RUIM? Nossa, Wendy, eu esperava mais de você. Joseph ficaria tão decepcionado.”
A menção do nome de Joseph foi um soco no meu estômago.
“Você não tem vergonha”, sussurrei.
“Tenho quatro filhos para pensar”, ela retrucou. “O que as pessoas diriam se soubessem que você — a esposa de Joseph — se recusou a ajudar os filhos dele?”
Desliguei e lágrimas de frustração queimaram meus olhos.

Uma mulher emocional perdida em pensamentos profundos | Fonte: Midjourney
Mas conforme os dias passavam, a culpa me corroía. Eu podia ouvir a voz de Joseph na minha cabeça, me pedindo para fazer o que eu pudesse pelas crianças. Sua gentileza, sua generosidade… eram armas que Camila sabia manejar perfeitamente.
Contra meu melhor julgamento, paguei pela viagem, esperando e REZANDO para que essa fosse a última de suas exigências.
Claro que não foi.
A batalha de Nathan contra a leucemia foi brutal. Quimio, internações hospitalares e noites sem dormir consumiram cada parte de mim. Mas mesmo assim, as demandas implacáveis de Camila não pararam. Ela era como um abutre, circulando e esperando para bicar o que restasse da minha força de vontade.

Um menino doente no hospital | Fonte: Midjourney
“Wendy, preciso de ajuda com as compras”, ela dizia, com a voz cheia de falsa vulnerabilidade.
“Wendy, as crianças precisam de novos laptops para a escola”, vinha outra ligação.
“Wendy, nossa máquina de lavar quebrou”, ela choramingava, como se o mundo fosse acabar sem minha intervenção.
Cada ligação vinha com uma nova crise, cada uma puxando minha paciência desgastada. O subtexto sempre era claro: Joseph teria ajudado. Joseph sempre providenciou. Joseph ficaria decepcionado comigo.

Um telefone sobre uma mesa exibindo uma chamada recebida | Fonte: Midjourney
Continuei ajudando, dizendo a mim mesma que era pelas crianças. Mas a cada pedido, uma parte de mim morria. Uma parte de mim se ressentia da lembrança da infinita gentileza de Joseph que Camila explorava tão implacavelmente.
E então, ela foi longe demais. “Wendy”, ela disse um dia, seu tom irritantemente casual, como se estivesse pedindo açúcar, “precisamos de ajuda para reformar a cozinha. Está caindo aos pedaços.”
Algo dentro de mim estalou.
“Camila, NÃO vou financiar seus sonhos de HGTV. Mal posso pagar os tratamentos de Nathan!”
O silêncio que se seguiu foi elétrico.
Ela engasgou, uma performance de pura indignação. “Não acredito em quão EGOÍSTA você se tornou. Joseph ficaria ENVERGONHADO.”
Essas palavras. Sempre essas palavras.

Uma mulher furiosa falando ao telefone | Fonte: Midjourney
“Joseph está MORTO”, eu disse, as palavras parecendo vidro quebrado na minha boca. “E você tem tratado a memória dele como um cartão de crédito.”
Seu suspiro foi teatral. “Como você ousa—”
“Não”, interrompi, “como VOCÊ ousa? Por anos, você me manipulou, me fez sentir culpa e drenou todos os meus recursos enquanto meu filho lutava por sua vida.”
Ela tentou interromper, mas eu já estava farto.
“Sinto muito, Camila”, eu disse friamente, cada palavra precisa e cortante. “Não posso mais te ajudar.” E desliguei.
Ela ligou de volta, deixou mensagens de voz que ficaram cada vez mais desesperadas e enviou e-mails que variavam de manipuladores a ameaçadores. Mas eu a ignorei. Nathan precisava de mim mais do que de suas crises fabricadas.

Um menino deitado em uma cama de hospital | Fonte: Midjourney
Várias semanas se passaram. Felizmente, meu filho venceu sua luta contra a leucemia, mas Camila não teve tanta sorte. Seus gastos extravagantes e dívidas crescentes finalmente a pegaram. Seu novo marido (um aspirante a músico que não contribuía em nada para a casa) foi embora, os credores cercaram e sua vida implodiu.
Ela tentou entrar em contato comigo, enviando e-mails longos e chorosos sobre o quão difíceis as coisas estavam. Ela até ligou, implorando por ajuda. Mas eu não respondi.
Em meio a tudo isso, os filhos dela se aproximaram de mim. Eles viram a verdade sobre a mãe deles e viram quem esteve lá por eles o tempo todo. Eles começaram a me chamar de “mãe”. E enquanto o mundo de Camila desmoronava, o meu ficava mais forte.

Uma mulher frustrada gritando | Fonte: Midjourney
Dez anos voaram. Na véspera de Natal, eu me vi em uma cama de hospital me recuperando de uma cirurgia cardíaca. As crianças — Nathan e todos os quatro de Camila — tinham prometido me visitar, mas eu não esperava muito. Eles estavam ocupados com suas próprias vidas agora.
Então meu telefone tocou. Era Camila.
Hesitei, mas respondi. “Alô?”
“O QUE VOCÊ FEZ?!” ela gritou.
“Com licença?”
“Você colocou meus filhos contra mim!”
“Camila, não entendo do que você está falando…”
Mas então a porta se abriu de repente, e seu filho mais velho, Marcus, rapidamente pegou o telefone da minha mão. Seu toque era gentil, mas seus olhos queimavam com uma fúria protetora que eu nunca tinha visto antes.

Uma mulher assustada envolvida em uma chamada telefônica | Fonte: Midjourney
“Mãe, você precisa descansar. Falaremos com ela mais tarde”, ele disse, seu tom não deixando espaço para discussão ao encerrar a ligação. A maneira como ele disse “ela” deixou claro que ele estava se distanciando de qualquer conexão maternal com Camila.
Quatro dos meus filhos “adotivos” e meu Nathan se aglomeraram no meu quarto de hospital, seus rostos radiantes de amor e calor. Marcus deu um passo à frente primeiro, colocando um elaborado buquê de rosas brancas que pareciam cuidadosamente escolhidas. Os mais novos seguiram, seus braços cheios de balões coloridos que balançavam e dançavam com seus movimentos.
“Não perderíamos isso por nada no mundo, mãe”, disse Nathan.
“Oh, meus queridos!”, exclamei, com lágrimas brotando em meus olhos. “Vocês não deveriam ter se dado a tanto trabalho!”

Uma mulher emocional | Fonte: Midjourney
Eles cercaram minha cama em um enorme abraço coletivo, seu abraço coletivo parecendo um escudo de amor e proteção. A mais nova, com lágrimas brilhando nos olhos, sussurrou: “Somos uma família. Cuidamos uns dos outros.”
Marcus apertou minha mão. “Natal não é Natal sem você. Então, vamos te levar para casa.”
Os outros assentiram em uníssono.
Naquela noite, eles me levaram para casa. Sentamos em volta da lareira, compartilhando histórias e memórias.
“O que aconteceu com sua mãe?”, perguntei cautelosamente. “Ela parecia tão furiosa quando ligou.”
Eles trocaram olhares antes de Marcus falar. “Depois que você parou de apoiá-la, ela tentou nos fazer sentir culpados para dar dinheiro a ela. Ela até disse: ‘Você me deve. Eu criei você!’” Ele balançou a cabeça. “Nós paramos de atender as ligações dela.”

Um jovem frustrado | Fonte: Pexels
“Ela ficou desesperada”, outro acrescentou. “Ligando para velhos amigos e parentes distantes, tentando conseguir dinheiro.”
“Ela tentou processar um cirurgião plástico”, outro entrou na conversa, rindo. “Mas não deu certo.”
A mais nova olhou para mim, seus olhos profundos de emoção. “Aprendemos o que é o amor verdadeiro com você. Não com ela.”
“Ela via as pessoas como transações”, Marcus acrescentou, apertando minha mão gentilmente. “Você nos mostrou que o amor não tem etiqueta de preço.”
“Ela está sozinha agora”, disse outro suavemente. “Mas estamos aqui, mãe. Estamos com você.”

Uma adolescente angustiada | Fonte: Pexels
Olhei ao redor da mesa, meu coração transbordando de alegria e paz. O Natal não é sobre presentes ou obrigações. É sobre a família que você constrói, e as pessoas que escolhem ficar, amar e crescer com você.
Pela primeira vez em anos, me senti verdadeiramente em paz. Quanto à Camila, eu realmente não me importo com ela agora. Ela pode viver com seus arrependimentos, mas espero que um dia ela perceba a profundidade do dano que ela fez a si mesma por ser gananciosa e manipuladora.
Uma idosa emocionada e com os olhos marejados | Fonte: Midjourney
Quando a nova esposa de Charlie o forçou a usar o dinheiro da falecida esposa reservado para os filhos nas filhas dela, ele ficou furioso. A lição que ele lhe ensinou foi algo que ela nunca esqueceria.
Este trabalho é inspirado em eventos e pessoas reais, mas foi ficcionalizado para fins criativos. Nomes, personagens e detalhes foram alterados para proteger a privacidade e melhorar a narrativa. Qualquer semelhança com pessoas reais, vivas ou mortas, ou eventos reais é mera coincidência e não intencional do autor.
O autor e a editora não fazem nenhuma reivindicação quanto à precisão dos eventos ou à representação dos personagens e não são responsáveis por nenhuma interpretação errônea. Esta história é fornecida “como está”, e quaisquer opiniões expressas são as dos personagens e não refletem as opiniões do autor ou da editora.


Leave a Reply